WordPress just wasn’t really doing it for me.
I’ve now chosen to move to a Bookstack instance located here.
Bookstack was a better choice for a lot of my documentation needs, without all the issues WordPress brings.
Hope to see you there!
WordPress just wasn’t really doing it for me.
I’ve now chosen to move to a Bookstack instance located here.
Bookstack was a better choice for a lot of my documentation needs, without all the issues WordPress brings.
Hope to see you there!
This is my Plex Nginx configuration file.
Works exceptionally well, only port 80 and 443 are allowed on the router.
The caveat is that “Remote Access” will always show as unavailable, but this will still work. Make sure to add “yourdomain.com:443” to Custom server access URLs in Plex network settings.
upstream plex_backend {
server <IP ADDRESS>:32400;
keepalive 32;
}map $http_upgrade $connection_upgrade {
default upgrade;
” close;
}server {
if ($host = plexserver.domain.com) {
return 301 https://$host$request_uri;
} # managed by Certbot
listen 80;
server_name plexserver.domain.com;
return 301 plexserver.domain.com$request_uri;
}error_log /var/log/nginx/plexserver.domain.com.error.log;
access_log /var/log/nginx/plexserver.domain.com.access.log;server {
listen 443 ssl http2; #http2 can provide a substantial improvement for streaming: https://blog.cloudflare.com/introducing-http2/
server_name plexserver.domain.com;send_timeout 100m; #Some players don’t reopen a socket and playback stops totally instead of resuming after an extended pause (e.g. Chrome)
#Faster resolving, improves stapling time. Timeout and nameservers may need to be adjusted for your location Google’s have been used here.
resolver 1.1.1.1 1.0.0.1 8.8.8.8 8.8.4.4 208.67.222.222 208.67.220.220 valid=60s;
resolver_timeout 5s;#Use letsencrypt.org to get a free and trusted ssl certificate
ssl_certificate /etc/letsencrypt/live/plexserver.domain.com/fullchain.pem; # managed by Certbot
ssl_certificate_key /etc/letsencrypt/live/plexserver.domain.com/privkey.pem; # managed by Certbotssl_protocols TLSv1.1 TLSv1.2;
ssl_prefer_server_ciphers on;
#Intentionally not hardened for security for player support and encryption video streams has a lot of overhead with something like AES-256-GCM-SHA384.
ssl_ciphers ‘ECDHE-RSA-AES128-GCM-SHA256:ECDHE-ECDSA-AES128-GCM-SHA256:ECDHE-RSA-AES256-GCM-SHA384:ECDHE-ECDSA-AES256-GCM-SHA384:DHE-RSA-AES128-GCM-SHA256:DHE-DSS-AES128-GCM-SHA256:kE$#Why this is important: https://blog.cloudflare.com/ocsp-stapling-how-cloudflare-just-made-ssl-30/
ssl_stapling on;
ssl_stapling_verify on;
#For letsencrypt.org you can get your chain like this: https://esham.io/2016/01/ocsp-stapling
ssl_trusted_certificate /etc/letsencrypt/live/plexserver.domain.com/chain.pem;#Reuse ssl sessions, avoids unnecessary handshakes
#Turning this on will increase performance, but at the cost of security. Read below before making a choice.
#https://github.com/mozilla/server-side-tls/issues/135
#https://wiki.mozilla.org/Security/Server_Side_TLS#TLS_tickets_.28RFC_5077.29
#ssl_session_tickets on;
ssl_session_tickets off;#Use: openssl dhparam -out dhparam.pem 2048 – 4096 is better but for overhead reasons 2048 is enough for Plex.
ssl_dhparam /etc/letsencrypt/ssl-dhparams.pem;
#ssl_ecdh_curve secp384r1;#Will ensure https is always used by supported browsers which prevents any server-side http > https redirects, as the browser will internally correct any request to https.
#Recommended to submit to your domain to https://hstspreload.org as well.
#!WARNING! Only enable this if you intend to only serve Plex over https, until this rule expires in your browser it WONT BE POSSIBLE to access Plex via http, remove ‘includeSubDomains$
#This is disabled by default as it could cause issues with some playback devices it’s advisable to test it with a small max-age and only enable if you don’t encounter issues. (Haven’t$#add_header Strict-Transport-Security “max-age=63072000; includeSubDomains; preload” always;
add_header Strict-Transport-Security “max-age=120; includeSubDomains; preload” always;#Plex has A LOT of javascript, xml and html. This helps a lot, but if it causes playback issues with devices turn it off. (Haven’t encountered any yet)
gzip on;
gzip_vary on;
gzip_min_length 1000;
gzip_proxied any;
gzip_types text/plain text/css text/xml application/xml text/javascript application/x-javascript image/svg+xml;
gzip_disable “MSIE [1-6]\.”;#Nginx default client_max_body_size is 1MB, which breaks Camera Upload feature from the phones.
#Increasing the limit fixes the issue. Anyhow, if 4K videos are expected to be uploaded, the size might need to be increased even more
client_max_body_size 200M;#Forward real ip and host to Plex
proxy_set_header Host $host;
proxy_set_header X-Real-IP $remote_addr;
proxy_set_header X-Forwarded-For $proxy_add_x_forwarded_for;
proxy_set_header X-Forwarded-Proto $scheme;
# Plex headers
proxy_set_header X-Plex-Client-Identifier $http_x_plex_client_identifier;
proxy_set_header X-Plex-Device $http_x_plex_device;
proxy_set_header X-Plex-Device-Name $http_x_plex_device_name;
proxy_set_header X-Plex-Platform $http_x_plex_platform;
proxy_set_header X-Plex-Platform-Version $http_x_plex_platform_version;
proxy_set_header X-Plex-Product $http_x_plex_product;
proxy_set_header X-Plex-Token $http_x_plex_token;
proxy_set_header X-Plex-Version $http_x_plex_version;
proxy_set_header X-Plex-Nocache $http_x_plex_nocache;
proxy_set_header X-Plex-Provides $http_x_plex_provides;
proxy_set_header X-Plex-Device-Vendor $http_x_plex_device_vendor;
proxy_set_header X-Plex-Model $http_x_plex_model;proxy_set_header Host $server_addr;
proxy_set_header Referer $server_addr;
proxy_set_header Origin $server_addr;#Websockets
proxy_http_version 1.1;
proxy_set_header Upgrade $http_upgrade;
proxy_set_header Connection “upgrade”;#Disables compression between Plex and Nginx, required if using sub_filter below.
#May also improve loading time by a very marginal amount, as nginx will compress anyway.
proxy_set_header Accept-Encoding “”;#Buffering off send to the client as soon as the data is received from Plex.
proxy_redirect off;
proxy_buffering off;location / {
#Example of using sub_filter to alter what Plex displays, this disables Plex News.
#sub_filter ‘,news,’ ‘,’;
#sub_filter_once on;
#sub_filter_types text/xml;
proxy_pass http://plex_backend;
}
}
|——————————————————————
[uploads]
comment = OctoPrint Time Lapses
path = /home/pi/.octoprint/uploads
writeable = Yes
only guest = No
create mask = 0777
directory mask = 0777
browseable = Yes
public = yes
[watched]
comment = OctoPrint Time Lapses
path = /home/pi/.octoprint/watched
writeable = Yes
only guest = No
create mask = 0777
directory mask = 0777
browseable = Yes
public = yes
[timelapse]
comment = OctoPrint Time Lapses
path = /home/pi/.octoprint/timelapse
writeable = Yes
only guest = No
create mask = 0777
directory mask = 0777
browseable = Yes
public = yes
[octoprint]
comment = OctoPrint Time Lapses
path = /home/pi/.octoprint
writeable = Yes
only guest = No
create mask = 0777
directory mask = 0777
browseable = Yes
public = yes
|——————————————————————
So I have a few private keys I generated for Public-Key SSH authentication. In Windows I manage SSH keys with Pageant – an SSH authentication agent for PuTTY. PuTTY is an awesome SSH/Telnet client for Windows that also comes with a suite of helper utilities like key generator and agent.
My work week starts like this: I log into my Windows workstation, open Pageant and load my keys one after another. Since the keys are encrypted I have to enter a password for each key. Once the keys are in memory I can securely log into multitude of Linux servers and routers (that have the public key) without enduring their login prompt each time. Pretty nice, but there is still some room for improvement.
I would like Pageant to start on boot/login and automatically load my keys. Pageant can load one or more private keys when it starts up if you provide them on the Pageant command line. The simplest way to do this in Windows is to create a specially crafted shortcut inside the Startup folder (Start -> Programs -> Startup):
You should see something like this:

If all you have is one private key, simply append its full path to your “Target” field like so:
Target: “C:\Program Files\PuTTY\pageant.exe” C:\Path\to\myKeys\MyKey.ppk
Not bad, but with multiple keys the line becomes rather long. It also feels rather silly to specify the same path multiple times when all keys are stored in the same folder like this:
Target: “C:\Program Files\PuTTY\pageant.exe” C:\Documents and Settings\myaccount\My Documents\myKeys\key1.ppk C:\Documents and Settings\myaccount\My Documents\myKeys\key2.ppk C:\Documents and Settings\myaccount\My Documents\myKeys\key3.ppk
This is where the field “Start in” can help. By changing it we can tell Pageant to start in the folder containing our keys and load them by file name:
Target: “C:\Program Files\PuTTY\Pageant.exe” key1.ppk key2.ppk key3.ppk
Start in: “C:\Documents and Settings\myaccount\My Documents\myKeys”
Much better! This single shortcut will start Pageant and load the keys. If the keys are stored encrypted, Pageant will request the passphrases on startup, otherwise they’ll be loaded without any prompts. If Pageant is already running, this will simply load the keys.
Source: https://blog.shvetsov.com/
I created this script just to make my life a little bit easier.
Requirements:
Either run this script as administrator or create a shortcut to this script, set it to run as admin.
@echo off
color 0a
goto check_Permissions
:check_Permissions
echo Administrative permissions required. Detecting permissions…net session >nul 2>&1
if %errorLevel% == 0 (
echo Success: Administrative permissions confirmed.
goto start
) else (
color 0c
echo Failure: Current permissions inadequate. Please run as administrator. Recommend creating shortcut and setting it to run as admin.
goto end
)pause >nul
:start
echo ===============
echo Folder Share Script
echo ===============
set /p arpath=Copy folder path into this window and press enter:
for %%A in (%arpath%) do set filename=%%~nxA
net share “%filename%”=”%arpath%” /GRANT:EVERYONE,FULL /CACHE:NONE
cls
echo Folder shared successfully. Press any key to exit
:end
pause > nul
This script enables you to enable and disable NIC’s as you wish. Make sure to run an elevated command prompt.
:::::::::::::::::::::::::::::::::::::::::
:: Automatically check & get admin rights
:::::::::::::::::::::::::::::::::::::::::
@echo off
ECHO.
ECHO =============================
ECHO Running Admin shell
ECHO =============================
:checkPrivileges
NET FILE 1>NUL 2>NUL
if ‘%errorlevel%’ == ‘0’ ( goto gotPrivileges ) else ( goto getPrivileges )
:getPrivileges
if ‘%1’==’ELEV’ (shift & goto gotPrivileges)
ECHO.
ECHO **************************************
ECHO Invoking UAC for Privilege Escalation
ECHO **************************************
setlocal DisableDelayedExpansion
set “batchPath=%~0”
setlocal EnableDelayedExpansion
ECHO Set UAC = CreateObject^(“Shell.Application”^) > “%temp%\OEgetPrivileges.vbs”
ECHO UAC.ShellExecute “!batchPath!”, “ELEV”, “”, “runas”, 1 >> “%temp%\OEgetPrivileges.vbs”
“%temp%\OEgetPrivileges.vbs”
exit /B
:gotPrivileges
::::::::::::::::::::::::::::
:START
::::::::::::::::::::::::::::
setlocal & pushd .
REM Run shell as admin (example) – put here code as you like
cls
goto Choices
REM use this command to determine what the adapter index number is
REM wmic nic get name, index
:Top
choice /c:123
If ERRORLEVEL == 3 goto NICIndex
If ERRORLEVEL == 2 goto Disable_LAN
If ERRORLEVEL == 1 goto Enable_LAN
goto EOF
:1
:Enable_LAN
wmic path win32_networkadapter where index=14 call enable
goto :EOF
:2
:Disable_LAN
wmic path win32_networkadapter where index=14 call disable
goto :EOF
:3
:NICIndex
cls
wmic nic get name, index
pause
goto :EOF
:Choices
echo 1 Enable LAN
echo 2 Disable LAN
echo 3 Get NIC index
goto Top
:EOF
To be able to run a single (or all) rules from a single button instead of having to use the outlook rules dialogue box, the following code should help:
First, go into the VB Editor, Tools -> Macro’s > Visual Basic Editor (or press ALT-F11)
Assuming you don’t already have any modules in here. Press Insert -> Module
You will be presented with a new window waiting for code, paste this in for all rules:
Sub RunAllInboxRules()
Dim st As Outlook.Store
Dim myRules As Outlook.Rules
Dim rl As Outlook.Rule
Dim count As Integer
Dim ruleList As String
‘On Error Resume Next’ get default store (where rules live)
Set st = Application.Session.DefaultStore
‘ get rules
Set myRules = st.GetRules‘ iterate all the rules
For Each rl In myRules
‘ determine if it’s an Inbox rule
If rl.RuleType = olRuleReceive Then
‘ if so, run it
rl.Execute ShowProgress:=True
count = count + 1
ruleList = ruleList & vbCrLf & rl.Name
End If
Next‘ tell the user what you did
ruleList = “These rules were executed against the Inbox: ” & vbCrLf & ruleList
MsgBox ruleList, vbInformation, “Macro: RunAllInboxRules”Set rl = Nothing
Set st = Nothing
Set myRules = Nothing
End Sub
The below is for a single rule, don’t forget to change rule name:
Sub RunAllInboxRules()
Dim st As Outlook.Store
Dim myRules As Outlook.Rules
Dim rl As Outlook.Rule
Dim runrule As String
dim rulename as stringRulename = “*****name of rule*****”
Set st = Application.Session.DefaultStore
Set myRules = st.GetRules
For Each rl In myRules
If rl.RuleType = olRuleReceive Then
If rl.Name = rulename Then
rl.Execute ShowProgress:=True
runrule = rl.NameEnd If
End If
NextruleList = “This rule was executed against the Inbox:” & vbCrLf & runrule
MsgBox ruleList, vbInformation, “Macro: RunAllInboxRules”Set rl = Nothing
Set st = Nothing
Set myRules = Nothing
End Sub
Source: http://pyrocam.com/
This script assumes that wget is installed in %SYSTEMROOT%.
The purpose of this script is to quickly download, install (with default settings), and update coretemp to the latest version on a machine
wget http://www.alcpu.com/CoreTemp/Core-Temp-setup.exe -O %UserProfile%\Desktop\coretemp.exe
%UserProfile%\Desktop\coretemp.exe /sp /silent /closeapplications
START C:\”Program Files”\”Core Temp”\”Core Temp.exe”
del %UserProfile%\Desktop\coretemp.exe
exit
Scroll Anchoring is a new feature of Google Chrome 51 and newer that prevents visible jumps of the active page when offscreen content changes.
You may have experienced the following situation when using a browser like Google Chrome: you load a page and some text is loaded quickly. You begin to read the text and scroll a bit or a lot, and suddenly the page begins to scroll automatically as other elements, images or media, are added to the page.
You lose sight of the position you were at when that happens. This scroll jumping can be confusing, as you need to locate the position on the page when things started to jump around to continue reading.
These visible jumps, when you start to scroll while a page is loading, is problematic on the desktop, and maybe even more so on mobile devices.
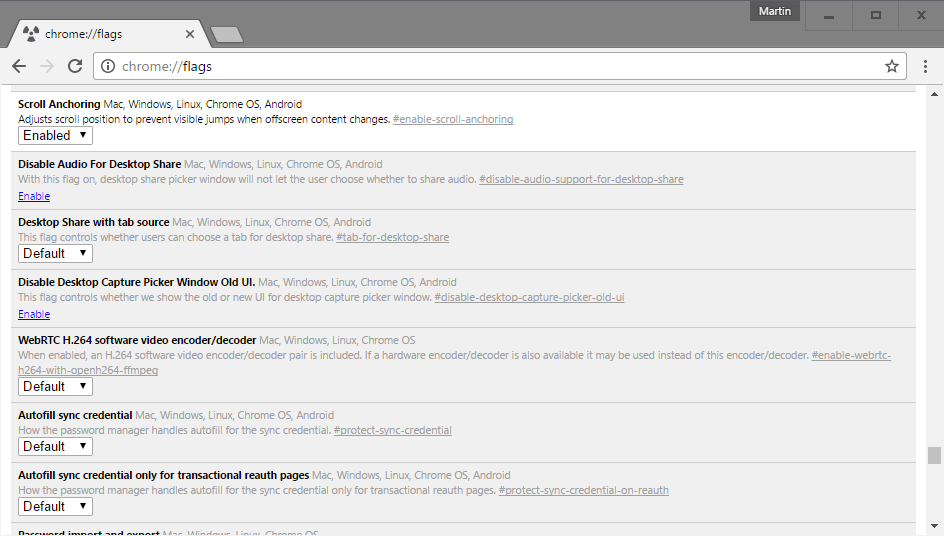
Scroll Anchoring has been designed to prevent these visible jumps from happening in Chrome. Basically, what the feature does is adjust the page in the background without jumping away from the part that is visible on the screen.
The feature is not enabled by default but part of the browser’s experimental flags. These features are not yet ready for prime time, or need further testing, before Google makes a decision whether to integrate it natively in Chrome or remove it again.
To enable scroll anchoring in Google Chrome, do the following:
The feature is available for all desktop versions of Google Chrome, for Chrome OS and for Chrome on Android.
To turn it off again, repeat the process outlined above but switch the preference to disabled this time to do so.
Source: http://www.ghacks.net/
Power down the Pi and remove the SD card. Insert it into your PC.
Thoughts on IT, Photography, and everything.
Thoughts on IT, Photography, and everything.
Thoughts on IT, Photography, and everything.

You must be logged in to post a comment.